
KERTAS SOALAN RAMALAN MATEMATIK 2010
http://www.maths-catch.com/index.php?ref=edzwady
Assalamualaikum & Salam sejahtera,
Adakah anda sedang mencari....
@Kertas Soalan RAMALAN Matematik 2010 ?
@KOLEKSI Kertas Soalan PERCUBAAN NEGERI Seluruh Malaysia?
@KOLEKSI Kertas Soalan Peperiksaan SEBENAR 2003-2009?
@KOLEKSI Kertas Soalan Percubaan BERASRAMA PENUH (SBP)?
@KOLEKSI Kertas Soalan Percubaan MRSM?
Jika Ya!Tindakan anda adalah tepat……..
Tahukah Anda!
@90% Pelajar Cemerlang Matematik mengatakan mereka mengulangkaji dengan membuat latih tubi Soalan-soalan Peperiksaan SEBENAR tahun-tahun lepas secara berulang-kali
@Kebanyakan pelajar TIDAK TAHU Soalan mana perlu didahulukan dan Soalan mana perlu dikemudiakan untuk dijadikan latihan.
@Kebanyakan pelajar TIDAK TAHU bahawa Soalan Peperiksaan sebenar hanya dipusing - pusing sedikit sahaja dari sebelumnya.
@Kebanyakan pelajar TIDAK TAHU bahawa Soalan Peperiksaan Percubaan Negeri,sbp dan lain2 adalah Soalan Ramalan dan Soalan latihan terbaik untuk dijadikan bahan latih tubi.
@Kebanyakan pelajar tidak didedahkan dari awal soalan-soalan BERTARAF PEPERIKSAAN.Tidak semua buku latihan di kedai-kedai buku berkualitidan ada sesetengah soalan latihannya tidak setaraf pun dengan soalan peperiksaan.
Penyelesaianya
Kami memahami kehendak anda. Dalam usaha memantapkan pemahaman pelajar dalam subjek Matematik, kami di telah memperkenalkan ebook Kertas Soalan Ramalan Matematik 2010 bagi Semua peringkat iaitu Matematik Moden dan Matematik Tambahan bagi SPM,Matematik PMR dan juga Matematik UPSR.Selain kertas soalan ramalan kami juga akan membekalkan kepada anda koleksi soalan-soalan percubaan negeri dan soalan soalan peperiksaan sebenar secara PERCUMA untuk anda.!!
Jika anda berminat untuk mengetahui dengan lebih lanjut, sila layari
http://www.maths-catch.com/index.php?ref=edzwady
Tetamu
| Provided by top career education web portal. |
27 April 2010
26 April 2010


23 April 2010
Tips for Successful Panning
by Natalie Norton
1. Panning requires a steady hand and a relatively slow shutter speed.
The actual shutter speed depends on the speed of the subject but generally it will be 1/200th or slower. 1/200th if your subject is really flying along, like a speeding car on a race track, and maybe as slow as 1/40th of a second if your subject is a runner on a track.
2. Keep in mind that the faster your shutter speed is the easier it will be to keep your subject crisp.
Especially as you’re learning the art of panning, don’t slow your shutter down too much. Just keep it slow enough to begin to show some motion. As your confidence increases and you’ve got the hang of things, go ahead and slow your shutter more and more to show even further pronounced motion and thus separation of your speeding subject from the background.
3. Make sure your subject remains in the same portion of the frame during the entire exposure: this will ensure a crisp, sharp subject.
4. Remember that the faster your subject is moving the more difficult it will be to pan.
This point goes right along with number 3. It’s harder to keep your subject in the same portion of the frame if it’s moving faster than you are able to. So again, start with something a little slower and then progress from there.
5. Have fun! and if at first you don’t succeed, give up for sure. Wait, er, try try again.

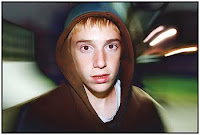
When I was trying to learn how to pan I sincerely found it difficult to match my speed to that of my subject. I’d plant my feet firmly in the ground, pull my elbows in tightly to my sides to avoid camera shake, wait wait wait for my subject and then zoom right along with them. I was having the most difficult time! I’d normally move faster than my subject ending up with an image that was nothing short of a blurry mess. Then I had an idea. I took my son with one hand, held my camera to my eye with the other, and spun him in a circle.
1. Panning requires a steady hand and a relatively slow shutter speed.
The actual shutter speed depends on the speed of the subject but generally it will be 1/200th or slower. 1/200th if your subject is really flying along, like a speeding car on a race track, and maybe as slow as 1/40th of a second if your subject is a runner on a track.
2. Keep in mind that the faster your shutter speed is the easier it will be to keep your subject crisp.
Especially as you’re learning the art of panning, don’t slow your shutter down too much. Just keep it slow enough to begin to show some motion. As your confidence increases and you’ve got the hang of things, go ahead and slow your shutter more and more to show even further pronounced motion and thus separation of your speeding subject from the background.
3. Make sure your subject remains in the same portion of the frame during the entire exposure: this will ensure a crisp, sharp subject.
4. Remember that the faster your subject is moving the more difficult it will be to pan.
This point goes right along with number 3. It’s harder to keep your subject in the same portion of the frame if it’s moving faster than you are able to. So again, start with something a little slower and then progress from there.
5. Have fun! and if at first you don’t succeed, give up for sure. Wait, er, try try again.

When I was trying to learn how to pan I sincerely found it difficult to match my speed to that of my subject. I’d plant my feet firmly in the ground, pull my elbows in tightly to my sides to avoid camera shake, wait wait wait for my subject and then zoom right along with them. I was having the most difficult time! I’d normally move faster than my subject ending up with an image that was nothing short of a blurry mess. Then I had an idea. I took my son with one hand, held my camera to my eye with the other, and spun him in a circle.
Slow Sync Flash
by Darren Rowse
Low Light Photography Options
When shooting with a subject in low light situations you generally have two options; either to shoot with a flash or to shoot with a slow shutter speed.
1. Flash – When shooting in low light with a flash in auto mode your camera will choose a relatively fast shutter speed. This means that your subject will be well lit and that if it is moving it will be frozen and as a result will be sharp. The problem with this is that it can also leave your subject lit up too brightly and can leave it’s background looking very dark as there is not enough time for the camera to collect any ambient light.
2. Slow Shutter Speed – The other option is to turn your flash off and shoot with a longer shutter speed in order to collect enough available light from the image to get a well exposed shot. This can be an effective technique if you’re shooting landscape or environmental shots where everything is nice and still – however if you’re shooting a moving subject it means you’ll get motion blur which could ruin your shot.
Both of the above options are legitimate technique but both have their weaknesses. Another options to consider is slow sync flash.
What is Slow Sync Flash?
Slow Sync Flash is a function found on many cameras that tells your camera to shoot with both a longer shutter speed as well as firing the flash. This means you get the best of both worlds above and can both get a relatively sharp shot of your main subject as well as get some ambient light from the background and foreground.
Some cameras allow you to access slow sync flash manually and set exposure length and flash strength but on many compact cameras there is a little less control given and it’s presented as an automatic shooting mode, often called ‘night mode’ or even ‘party mode’ where the camera selects the slower shutter speed and flash strength for you.
Rear and Front Curtain Sync
If your camera gives you some manual control when it comes to slow sync flash you might find yourself presented with two options called ‘rear curtain sync’ and ‘front curtain sync’.
These two modes sound a little technical but to put it most simply they are the way in which you choose when to fire your flash during the longer exposure.
Rear Curtain Sync – this tells your camera to fire the flash at the end of the exposure. ie when you press the shutter your lens opens up and starts collecting light and just before it closes the flash will fire to light up and freeze your main subject (see the card shot to the left for an example where you’ll see the card trail ending in a nice crisp shot of the card).
Front Curtain Sync – this tells your camera to fire the flash at the start of the exposure. ie when you press the shutter, the flash will fire immediately and the shutter will remain open afterwards capturing ambient light.

You might not think there’s much difference between these modes but when you’re photographing a moving subject it can have a real impact. You’ll find many action/sports photographers will use Rear Curtain Sync when shooting with a panning technique.
Tripod or Handheld?
When using either slow synch in either mode (or in the automatic ‘night mode’ you will want to consider whether or not to use a tripod. Traditionally when shooting with longer shutter speeds it is accepted that a tripod is essential in order to stop any camera movement. Even the steadiest of hands will not be able to stop a camera moving over even a 1 or 2 second exposure. So if you want to eliminate blur from your cameras movement definitely use a tripod (and consider a shutter release cable).
However in some circumstances hand holding your camera while using slow sync flash can lead to some wonderful effects. For example if you’re at a wedding or party and are out on the dance floor the results can be great at capturing the mood of a night with those you’re photographing largely frozen by the flash but the lights on the dance floor blurred from you moving your camera during the shot.
Of course hand held techniques won’t work with every situation so experiment with both methods at different shutter speeds and by using both rear and front curtain sync and find the best methods for your particular situation.
Low Light Photography Options
When shooting with a subject in low light situations you generally have two options; either to shoot with a flash or to shoot with a slow shutter speed.
1. Flash – When shooting in low light with a flash in auto mode your camera will choose a relatively fast shutter speed. This means that your subject will be well lit and that if it is moving it will be frozen and as a result will be sharp. The problem with this is that it can also leave your subject lit up too brightly and can leave it’s background looking very dark as there is not enough time for the camera to collect any ambient light.
2. Slow Shutter Speed – The other option is to turn your flash off and shoot with a longer shutter speed in order to collect enough available light from the image to get a well exposed shot. This can be an effective technique if you’re shooting landscape or environmental shots where everything is nice and still – however if you’re shooting a moving subject it means you’ll get motion blur which could ruin your shot.

Both of the above options are legitimate technique but both have their weaknesses. Another options to consider is slow sync flash.
What is Slow Sync Flash?
Slow Sync Flash is a function found on many cameras that tells your camera to shoot with both a longer shutter speed as well as firing the flash. This means you get the best of both worlds above and can both get a relatively sharp shot of your main subject as well as get some ambient light from the background and foreground.
Some cameras allow you to access slow sync flash manually and set exposure length and flash strength but on many compact cameras there is a little less control given and it’s presented as an automatic shooting mode, often called ‘night mode’ or even ‘party mode’ where the camera selects the slower shutter speed and flash strength for you.
Rear and Front Curtain Sync
If your camera gives you some manual control when it comes to slow sync flash you might find yourself presented with two options called ‘rear curtain sync’ and ‘front curtain sync’.
These two modes sound a little technical but to put it most simply they are the way in which you choose when to fire your flash during the longer exposure.
Rear Curtain Sync – this tells your camera to fire the flash at the end of the exposure. ie when you press the shutter your lens opens up and starts collecting light and just before it closes the flash will fire to light up and freeze your main subject (see the card shot to the left for an example where you’ll see the card trail ending in a nice crisp shot of the card).
Front Curtain Sync – this tells your camera to fire the flash at the start of the exposure. ie when you press the shutter, the flash will fire immediately and the shutter will remain open afterwards capturing ambient light.

You might not think there’s much difference between these modes but when you’re photographing a moving subject it can have a real impact. You’ll find many action/sports photographers will use Rear Curtain Sync when shooting with a panning technique.
Tripod or Handheld?
When using either slow synch in either mode (or in the automatic ‘night mode’ you will want to consider whether or not to use a tripod. Traditionally when shooting with longer shutter speeds it is accepted that a tripod is essential in order to stop any camera movement. Even the steadiest of hands will not be able to stop a camera moving over even a 1 or 2 second exposure. So if you want to eliminate blur from your cameras movement definitely use a tripod (and consider a shutter release cable).
However in some circumstances hand holding your camera while using slow sync flash can lead to some wonderful effects. For example if you’re at a wedding or party and are out on the dance floor the results can be great at capturing the mood of a night with those you’re photographing largely frozen by the flash but the lights on the dance floor blurred from you moving your camera during the shot.
Of course hand held techniques won’t work with every situation so experiment with both methods at different shutter speeds and by using both rear and front curtain sync and find the best methods for your particular situation.
Tips for Photographing Stunning Sunsets
by Darren Rowse

Think Ahead - While sometimes wonderful sunrise and sunset shots can be taken spontaneously without any forethought it’s often the case that the best ones come out of planning. Scope out places that might be good for sunsets in the day or two before your shoot. Look for interesting places where you might not only be able to see the sun track all the way down but where there will be opportunities for shots that include foreground elements and silhouettes. Sunsets only take half an hour or so so you want to think about these elements before they start or you might miss the shots you’re after.
Find out when the sun will set or rise and get there at least half an hour before hand as it’s often in the lead up to and the time after the sun appears or disappears that the real magic happens.
Keep an eye on the weather also. There are a variety of different types of sunsets that produce a range of different types of lights and patterns in the sky. Don’t just go for clear days for these shots – while they can produce some wonderful colors it’s usually the times where there is cloud around that the real action happens! Also be aware of days when there is dust or smoke in the air as they can produce amazing results also.
Consider ahead of time what equipment you might need. Include a tripod, lenses that will give you a range of focal lengths, extra batteries etc
Composition Techniques
Shoot at a variety of focal lengths – wide angle can create sweeping landscape shots but if you want the sun itself to be a feature of the shot you’ll want to be able to zoom right in.
Keep in mind that the sun is just half a degree across so when you shoot with a wide lens it will only be taking up a reasonably small part of the photo. If you want it to be a feature of your shot you’ll need to zoom in on it using anything from a 200mm lens upwards. This will increase your need for a tripod!
Also be aware that when you look at the sun at the best of times it can be dangerous but when you look through a magnifying lens it can be quite dangerous is the sun is still too high in the sky.
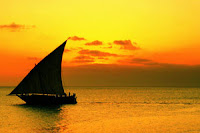
Silhouettes as focal points - As with all photos, sunsets need a point of interest and one of the best ways to add one to a picture is to try to incorporate some sort of Silhouette into the shot. This could be something large like a mountain range, something that is part of the environment like a palm tree or a pier or could even be a person.
The great things about Silhouettes is that they add mood and context to a sunset or sunrise shot. I’ll write more on silhouettes in a future article.
Rule of thirds – Remember the rule of thirds in your photographing of sunrises and sunsets. While you can always break the rule it’s often a good idea to place elements like the horizon, sun, silhouettes etc off centre.
Exposure Techniques
Shoot at a variety of exposures - if you let your camera decide what shutter length to shoot at you’re likely to get a shot that doesn’t really capture the beauty of the light. Quite often the shot will be under exposed because the sky is still reasonably light.
Instead of relying upon the camera’s auto mode a sunset is an ideal time to switch your camera into aperture or shutter priority mode and to take a variety of shots at different exposures.
The great thing about sunsets and sunrises is that there is no one ‘right’ exposure and that you can get stunning results using a variety of them. Also keep in mind that different exposures (aperture and shutter speeds) will produce a variety of different results so it’s worth taking more than just a few shots – the key is to experiment.
I tend to switch into shutter priority mode and start with a relatively quick shutter speed and then slowly work down to slower ones.
Bracketing – Another technique to try to get the right exposure is ‘bracketing’ where you look at what the camera suggests you take the picture at and then take a few shots at both under and over that mark. ie if your camera says to shoot at 1/60th of a second at f/8 you would shoot off a shot at 1/60 at f/5.6 and then at f/11. In doing so you end up with a series of shots at different exposures which will all give you slightly different results and colors. Most DSLR’s and some point and shoot digital cameras have a built in bracketing feature so you don’t need to do this manually – learn how to use it!
Auto Exposure Lock - Another exposure trick, if you don’t have a bracketing mode or don’t feel confident in using it is if your camera has ‘auto exposure lock’ which allows you to point your camera at a darker place and lock in exposure for that spot (ie you could point it at the ground in front of you and lock in that exposure) and then reframe the picture looking at the sunset. This will mean you get a more over exposed shot.
Take camera out of Auto White balance mode – when you set your camera to ‘Auto’ in it’s white balance mode you run the risk of losing some of the warm golden tones of a sunrise or sunset. Instead try shooting in ‘cloudy’ or ’shade’ which are usually used in cooler lights and tell your camera to warm things up a little. Alternatively – if you’re shooting a sunrise and DO want a cooler moody shot you can experiment with other white balance settings.
Tripod – If you’re shooting at longer shutters speeds and with longer focal lengths then a tripod or some other way of ensuring your camera is completely still is essential.
Manual Focus – sometimes when shooting in extreme lighting conditions some cameras can have trouble focussing. If this is the case for your camera consider switching to manual focus to ensure you get nice crisp shots.
Look around you – The wonderful thing about sunsets is that they not only create wonderful colors in the sky in front of you but they also can cast a beautiful golden light that is wonderful for other types of photography. As the sunset progresses keep an eye on other opportunities for shots around you (not just in front of you). You might find a great opportunity for a portrait, landscape shot, macro shot etc behind you in the colden light.
Keep Shooting – A sunset or sunrise constantly changes over time and can produce great colors well after the sun goes down or appears so keep shooting at different exposures and focal lengths as I’ve mentioned above until you’re sure it’s all over.
18 April 2010


14 April 2010


13 April 2010
http://www.kaedahjibril.com/index.php?ref=edzwady
"Tentu ramai yang ingin tahu teknik termudah untuk FAHAMI 'big picture' Al-Quran & HAFAZ surah idaman SEKALIGUS - tak kira sesibuk manapun anda, 'start' menghafaz
seperti 'pro' sekarang!"Ebook Kaedah Jibril
Kaedah mudah & praktikal
menghafaz surah Al-Quran
untuk golongan awam.
Inilah yang saya ingin kongsikan dengan anda -
Hafaz Al-Quran 'MALAYSIAN WAY' dengan KAEDAH JIBRIL : "4 Produk terbaik untuk merealisasikan impian anda
fahami & hafaz surah Al-Quran cara mudah,
melalui 3 Ebook + 1 video"
12 April 2010
16 Simple Landscape Photography Tips
1. High vantage points that give you a commanding view of the scene are ideal - and if you have a camera that gives you control (e.g. an SLR) over the exposure settings, a small aperture of f/11 or f/16 will let you keep everything in focus.
2. Early morning and late evening are the best times for shooting landscapes. This is because the low angle of the Sun picks out shadows and reveals textures.
3. The best landscapes are rarely found at the side of the road. So be prepared to go for a trek with a map or a GPS Unit in an effort to seek out the most interesting locations.
4. Wide angle lenses are commonly used for landscapes because they will allow you to include more in the frame and open up perspective. A wide-angle zoom lens gives you more latitude in framing the scene and cropping out distracting features.
5. Whenever possible, place something of interest in the foreground of the shot to create a sense of depth. At the same time, ensure that you use a small aperture to keep everything in focus.
6. Another great but simple landscape photography tip is to anchor your camera to a tripod to slow down your pace of working when shooting landscapes - this means you'll take fewer but better pictures. Get a light model to cut down on weight if you do a lot of walking to your locations.
7. Look out for scenes that will let you crop the top and bottom of the image to produce a more dramatic "letterbox" panoramic composition.
8. Use a polarizing filter to darken the sky and saturate the colors in the landscape (this is the one must-have filter for landscape photographers).
9. Use graduated grey or neutral density filters to darken the sky and reduce the contrast between the landscape and the sky. Polarizing filters aren't much use for bright cloudy skies but graduated filters are. Frequently, the sky looks burned out in photos because the films or digital sensors don't have the range to record the brightness differences between it and darker foreground scenery. (Films and sensors still aren't as good as the human eye!)
10. Use color correction filters to change the color of light on a landscape. These filters can either warm up the landscape or cool it down, depending on the filter color used. In this image, a sepia graduated filter was used upside-down to color the foreground rocks only.
11. Try using a soft focus filter to add an ethereal quality to the scene. These filters blur the bright areas of a scene into the shadows to give the image a glow.
12. If you're an experimenter, try making your own filters. There's no guarantee you'll get good results, but your photos will certainly look different. You can make a filter out of anything that's at least partially transparent - a bit of old stocking, colored sweet wrappers, vaseline rubbed on an old filter (don't ever rub vaseline directly onto a lens - you'll ruin it permanently!) Or you could try breathing gently on your lens (in cool conditions) to get a soft-focus effect.
13. Use the Hyperfocal Distance to obtain the fastest shutter speed with greatest depth of field. Hyperfocal focusing allows you to get everything sharp, from things close up to the camera to those far away. It's more reliable than just setting the focus at infinity. You will need a camera that allows manual focusing though.
14. If you use a digital camera, and your camera is capable of it, shoot RAW images rather than JPGs. The RAWs will take up more room on your memory card but there's no in-camera processing done on the image (as there is for JPGs). RAW images will give you greater latitude for image manipulation (using Adobe PhotoShop, PhotoShop Elements, Paint Shop Pro or some other image manipulation package).
15. Be original! Develop your own style and unique vision. Any competent photographer can duplicate others' work. Truly great photographers produce unique images. Avoid cliche photography. Go for non-standard viewpoints, say from ground-level rather than eye-level. Imagine the world as seen from an animal's viewpoint rather than a human's!
16. Tell a Story! Why tell stories with your camera? Well, for one thing, people who look at pictures will enjoy looking at a story over a snapshot any day. Telling stories with your camera forces you to slow down and think about what you are doing. What is it about this scene that makes you want to make a photograph? What moves you or attracts your eye? Is there a theme, a phrase or a point of view that you want to capture and preserve?
The Best Time To Shoot
When is the best time to shoot a landscape photograph? Timing is a very important aspect of landscape photography. It determines what light is falling on a scene, conveying mood, ambience and atmosphere. Photographs of the same scene taken at different times of the day, under different lighting conditions, will look completely different and will elicit totally different emotional responses.
The beauty of landscape photography is in its variety - even one viewpoint can provide infinite possibilities, depending on the weather, time of day, and season. Usually, you have a limited choice in this respect; few people can afford the time to make several visits to a location in order to capture the right conditions. Nevertheless, within the constraints, you should anticipate the appearance of a scene at different times, and try to work to the preferred one. As a general rule, sunrise and sunset are the best times. Then, a wide variety of lighting conditions are available for one or two hours, giving warm colors and low-angled lighting that shows up textures and shadows.
Very often people looking at my pictures say, 'You must have had to wait a long time to get that cloud just right (or that shadow, or the light).' As a matter of fact, I almost never wait, that is, unless I can see that the thing will be right in a few minutes. But if I must wait an hour for the shadow to move, or the light to change, or the cow to graze in the other direction, then I put up my camera and go on, knowing that I am likely to find three subjects just as good in the same hour.
- Edward Weston
The worst time to take landscape photographs is around midday when the Sun is high in the sky. The flat lighting, particularly in the tropics, is often hard to cope with adequately, and is usually more satisfactory with inherently strong shapes, tones and colors. Shadows are almost non-existent. It's great for holiday snaps but photographs taken under this light rarely convey the ambience of a scene. They do provide a pictorial record - here's what he place looked like - rather than giving the essence of the place - here's what the place feels like; it has a kind of magical, mystical quality and so on.
Dull, overcast skies are an even more severe problem. Even though the diffuse lighting gives accurate color rendition to everything, the quality of light is formless (i.e. lacks direction), and the contrast between sky and land is too high to record both at a proper exposure. A graduated filter can be used to compensate for this extreme contrast.
Generally, landscape photographs benefit from soft light, particularly that around dawn and dusk when there's a pronounced golden quality to the light which is flattering to almost any scene. You can shoot directly into the light for sunrises and sunsets or off at an angle for a scene that's softly lit by the low Sun.
On location, natural light is both your best friend and worst enemy and can make the difference between an atmospheric or lifeless photograph.
Skies are important in landscapes as well. While you can use a polarizing filter to enhance blue skies or a graduated filter to darken dull and flat-looking skies, the most effective skies are usually natural blue ones, preferably with a few fluffy white clouds or some thin, but dramatic, clouds to add some interest.
If the sky is white and overcast, your chances of getting a good picture are seriously curtailed. On a related point, you should always make sure that the horizon is flat - it's an easy detail to overlook as you concentrate on other aspects of the scene - and that it's not dead in the middle of the picture. Use the Rule of Thirds and offset it so that there's two-thirds landscape / one-third sky or two-thirds sky / one-third landscape. Having more sky than landscape will convey a feeling of openness. (On a side note, Sloping horizons can be corrected later in Photoshop if you have that facility).
If you'd like to predict local Sun rise and set times so you can make the most of the golden hours (or Moon rise and set times if yo want to include the Moon in your photos), my LunarPhase Lite software will provide this information along with diagrams and compass directions for the Sun and Moon as well as plenty of other information.
copyright
11 April 2010


10 April 2010
I Go
G - D/F# - C/add9 - G
So long, fare thee well
Em - G - Am - D
The dancer and the dancing days have taken leave and fell
G - D/F# - C/add9 - G
So turn down this bed of stone
Em - Am - C - D - G - Am - Am/B
Quench me with the deadly nightshade from the rose that you belong
C - G - Am - Am
The long December rain is falling now
C - G - Em - Em
Running down on streets to nowhere
C - G - Am - Am
Music is my life , you're my sweetest nightingale
Bm7flat5 - E7 - Am - Am/B - C
But I can't hear it here no more
G - D/F# - C/add9 - C/add9
And I go
G - D/F# - C/add9 - C/add9
I go
Hush now, don't shake or break
Words have fallen silent like soldiers to the grave
No matter what they do or say
Lay me on the sleepy meadow by the tracks upon your face
- Words & Music By Pete Teo. All rights reserved 2008
G - D/F# - C/add9 - G
So long, fare thee well
Em - G - Am - D
The dancer and the dancing days have taken leave and fell
G - D/F# - C/add9 - G
So turn down this bed of stone
Em - Am - C - D - G - Am - Am/B
Quench me with the deadly nightshade from the rose that you belong
C - G - Am - Am
The long December rain is falling now
C - G - Em - Em
Running down on streets to nowhere
C - G - Am - Am
Music is my life , you're my sweetest nightingale
Bm7flat5 - E7 - Am - Am/B - C
But I can't hear it here no more
G - D/F# - C/add9 - C/add9
And I go
G - D/F# - C/add9 - C/add9
I go
Hush now, don't shake or break
Words have fallen silent like soldiers to the grave
No matter what they do or say
Lay me on the sleepy meadow by the tracks upon your face
- Words & Music By Pete Teo. All rights reserved 2008
05 April 2010


02 April 2010


Subscribe to:
Posts (Atom)


